Documentation
Introduction
Please carefully read this guide in order to fully configure this template, and remember to test it on a Real Device – the Emulator may fail.
An internet connection is required.
IMPORTANT: The backend of this template is the DBase API.
A VPS Server, minimum 2GB RAM, 1 vCPUs is required to run the DBase API.
I strongly recommend you to use AWS Lightsail with Ubuntu 18.04, solid servers and good prices
I strongly recommend you to use AWS Lightsail with Ubuntu 18.04, solid servers and good prices
In case you want to use a different backend, you'd need to change 80% of the code. Please note that I will not be responsible for any bug encountered after editing the original source code
Quick Start
BEFORE running this app on your own device via Anroid Studio and test it, you must do the following:
- Copy the path (URL) where you’ve hosted the DBase files - ex:
https://mydomain.com/dbasefiles- and replace the string of theDATABASE_PATHvariable in theDBase.javafile with your URL:public static String DATABASE_PATH = "https://xsgames.co/__apps/eventik/"; -
Enter the _Tables folder on your server and delete the
Users.jsonandPosts.jsonfiles - Upload the JSON files included in the Tables folder of this template’s package into the _Tables folder
Your app is now connected to your DBase backend!
General
Android Studio
This template has native Android Java/XML code so you can edit it only with Android Studio. If you don’t have it, download it for free.
Download Android Studio
PLEASE NOTE that you’ll need the latest official version of Android Studio, NO BETAS, because Betas are always buggy and never work properly.
Please make sure you have installed the following SDK Tools: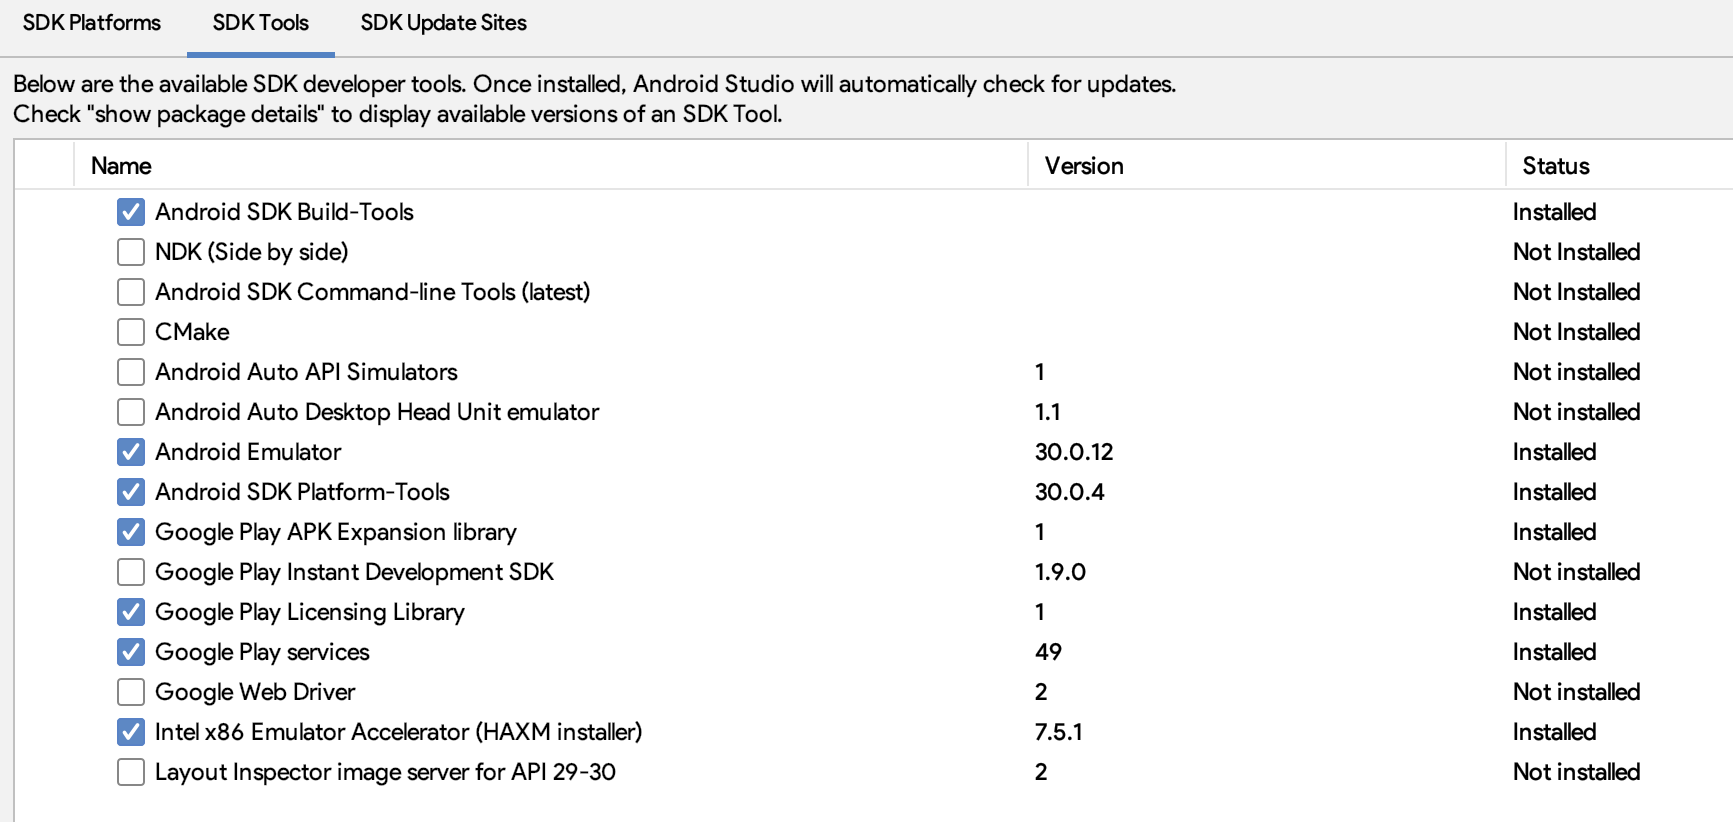
Change App Name
Enter thestring.xml file – it’s into the res/values folder in Android Studio – and replace the App Name of this line with your new one:
<string> string name="app_name"> Eventik </string>
Change the Package Name
- In the Project panel on the left side, click on the little gear icon.
- Uncheck the Compact Empty Middle Packages option.
-
Your package directory will get separated into single directories, I'd suggest you to leave the
comfolder as it is and rename the other ones.
So, for each directory you want to rename:
• Right-click on it
• Select Refactor -> Rename...
• Click Rename Package in the popup
• Enter a new name in the text field and click Refactor
• Click Do Refractor in the Refactoring Preview tab on the bottom
• Android Studio will update the changes, it may take a few seconds, just wait for the process to be done.
Next, open
build.gradle (the Module app one) in Android Studio and rename the applicationId into your new package name, then click Sync Now on the top-right corner.

Reskin the UI design of the app
This project contains.xml files stored into the res/layout folder. Those files are the ones where you can edit all Views, Buttons texts, TextView’s strings, and all Views attributes – position, font color, size, etc.
Alert messages are located in the code, they can be edited only in the
.java files.
All images are stored in the
drawable folders, where the app icons are stored into the mipmap folders.
Terms of Use and Privacy Policy
Open thetou.html file form the left-side panel’s list in Android Studio and edit it accordingly to your own Terms of Service and Privacy Policy. Also, replace the APP_NAME words with the new name you assigned to your App.
Please also pay attention to this line:
"mailto:support@yourdomain.com">support@yourdomain.com
There are a few identical lines like that in the
tou.html file, so you must replace support@yourdomain.com with a valid email address where people can contact you for any question, feedback or in case they want to delete their account.
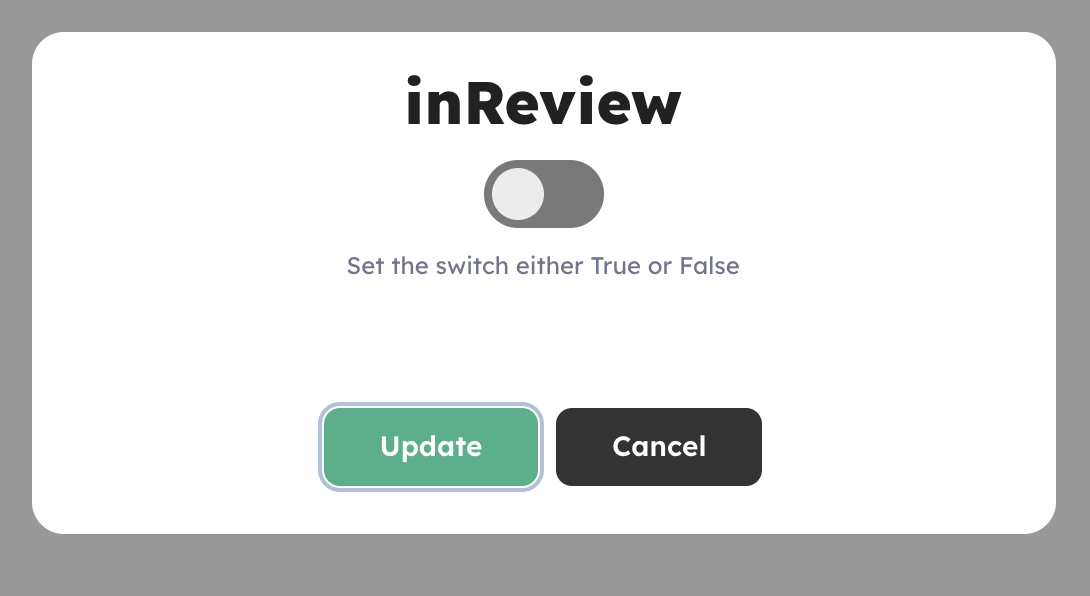
Approve submitted Events
You should get an email when a new event has been submitted or if someone edited his/her own event, anyway I suggest you to still daily check the Events table of your database in order to see if some value of theinReview column is set into True.In this case, check out all the cells of that row, and if everything is ok for you (so it doesn’t contain nudity or other inappropriate content), you can approve that event by simply switching the
True switch into False.
Delete a User’s account upon request
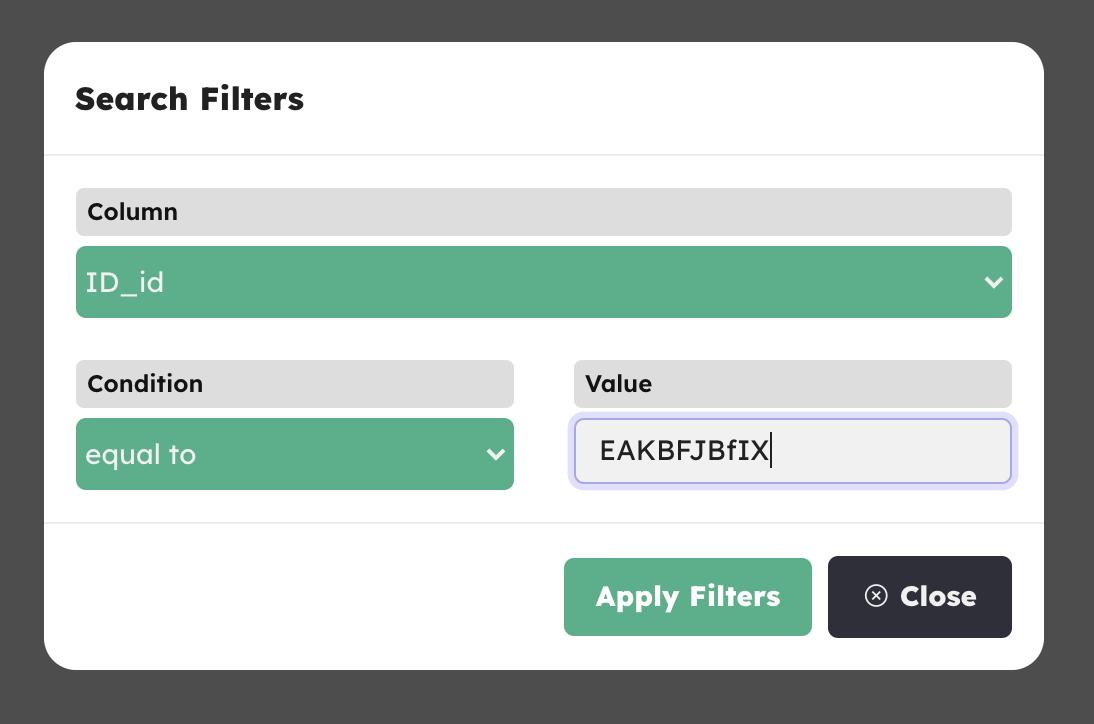
Accordingly to GDPR Terms, you have 24 hours to delete an account after receiving a deletion request. In order for you to delete an account, you first need to identify the user’s row in the Users table of your Database, keep a note of itsID_id value, select that row and click the Delete Row(s) button.Then, just search for that
ID_id value you’ve previously noted in all the other Tables of your database, check out all the rows until you’ll find that ID_id and delete it – this happens in case it appears into some Array type columns.
Use the Search filters function to find an
ID_id in your database:
Configurations
• The strings.xml file
You can find this file into theres/values folder in Android Studio. Open this file and keep reading this guide, you’ll have to perform some edits in this file in order to get your template ready to run.
App Name
Replace the following name with the new one you want to give to this app in this line: <string> string name="app_name"> Eventik </string>
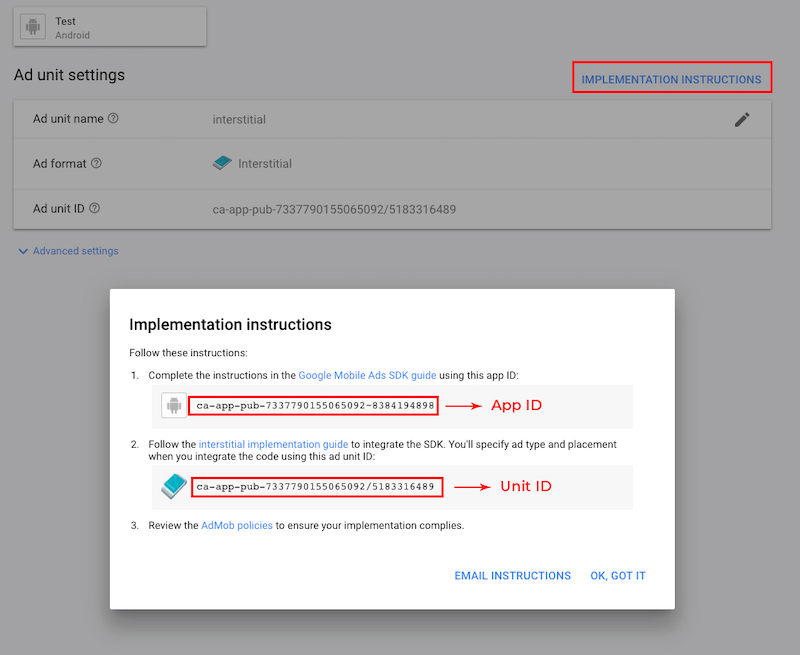
AdMob Ads
Replace the values of these variables with your own Interstitial Unit ID and App ID strings. <string>name="ADMOB_INTERSTITIAL_UNIT_ID">ca-app-pub-3940256099942544/1033173712
<string>name="ADMOB_APP_ID">ca-app-pub-3940256099942544~3347511713
Follow the instructions on the AdMob’s website in case you don’t know how to generate an AdMob Unit ID.
Google Maps API Key
You must replace the Google Maps API Key with your own one in the variable below – you can generate your Maps Key on this LINK after setting up a Google Billing account (required since middle 2018): <string name="google_maps_key"> AIzaSi123fdre456rfgFd456tytr65hsfger5 </string>
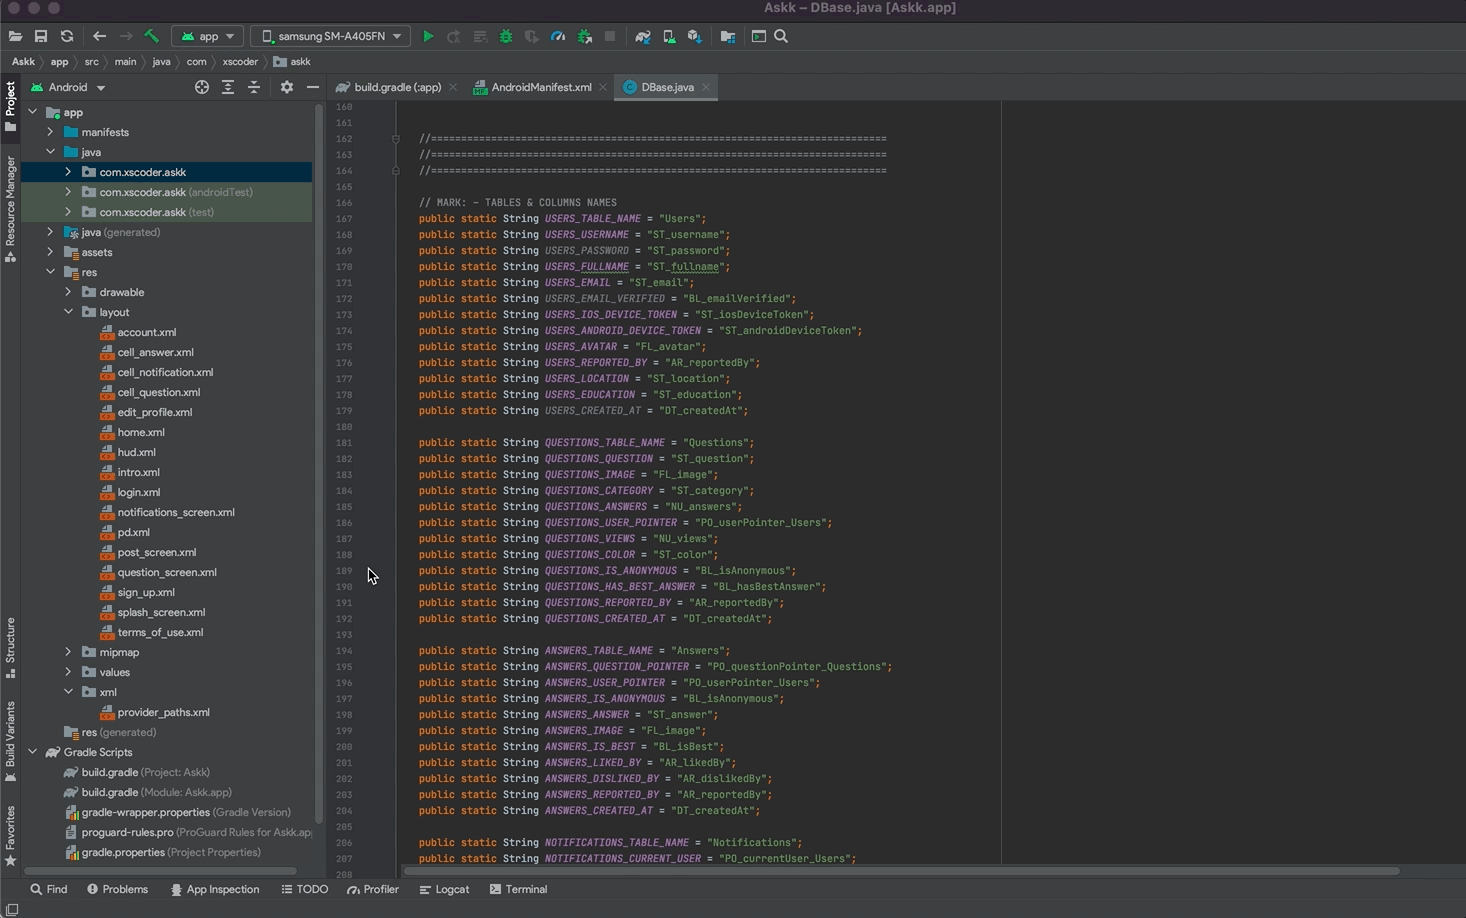
• The DBase.java file
Open this file in Android Studio and keep reading this guide, you’ll have to perform some edits in this file in order to get your template ready to runDBase database and admin panel
To install and configure the DBase admin panel into your VPS server, please follow the instructions of its README file
Once you’ll have the DBase files ready in your own server, enter the _Tables folder and:
-
Delete the
Users.jsonandPosts.jsonfiles - Upload the JSON files included in the Tables folder of this template’s package
In this way, you’ll get all the necessary Tables and columns for this app to work, without having to manually create them in the DBase Dashboard.
Data will be empty, so after you’ll get this app’s configurations done, you’ll be able to sign up with test Users, post items, and all the other features.
Data will be empty, so after you’ll get this app’s configurations done, you’ll be able to sign up with test Users, post items, and all the other features.
Custom Colors
You can edit the HEX values of the following variables as you wish, change the numbers before the# symbol. The main color of the app and some UI will be affected by your change:
 public static String MAIN_COLOR =  "#f76830";
 public static String GRAY = "#777777";
 public static String BLACK_COLOR = "#252525";
PLEASE NOTE that not all views will be affected by changing the HEX values above, you may still need to go through some XML file and adjust the colors on your own with the right-side Attributes panel.
Custom fonts
This App uses some custom fonts for Buttons, TextViews and EditTexts. The font files are stored into the public static Typeface osBold, osSemibold, osRegular, osExtraBold, osLight, osItalic, cunia;
onCreate() function as follows:
 cunia = Typeface.createFromAsset(getAssets(),"font/Cunia.ttf");
osBold = Typeface.createFromAsset(getAssets(),"font/OpenSans-Bold.ttf");
osSemibold = Typeface.createFromAsset(getAssets(),"font/OpenSans-Semibold.ttf");
osRegular = Typeface.createFromAsset(getAssets(),"font/OpenSans-Regular.ttf");
osExtraBold = Typeface.createFromAsset(getAssets(),"font/OpenSans-ExtraBold.ttf");
osLight = Typeface.createFromAsset(getAssets(),"font/OpenSans-Light.ttf");
osItalic = Typeface.createFromAsset(getAssets(),"font/OpenSans-Italic.ttf");
.ttf or .otf font file into the app/src/main/assets/font folder.Then instantiate it at the end of the
public static Typeface line that’s into the onCreate() function – let’s pretend you have a font file called Helvetica-Bold.ttf, you may add an instance called hBold (it’s just an example, name it as you wish since it’s a variable):
public static Typeface popBold, popSemibold, ... hBold;
onCreate() function like the existing ones. Based on the font example above, your new line of code may look like this:
hBold = Typeface.createFromAsset(getAssets(),"font/helvetica-Bold.ttf");
Default Location coordinates
You can edit the GPS coordinates of the DEFAULT_LOCATION variable as you wish: public static LatLng DEFAULT_LOCATION = new LatLng(40.7143528, -74.0059731);
Distance range around a Location
This value is expressed in Km, but it’s ok for Miles too since it’s just a number. You can edit it as you wish, the app needs such value to search for Events around a city: public static double EVENTS_LOCATION_RANGE_KM = 100;
Popular Cities array
The following array contains a list of Cities and GPS coordinates that are present in the app: public static String[] popularCitiesArray = {
"New York_New York_40.7143528_-74.0059731",
"Los Angeles_California_34.0522342_-118.2436849",
"London_United Kingdom_51.5073509_-0.1277583",
"Rome_Italy_41.9027835_12.4963655",
"Miami_Florida_25.7616798_-80.1917902",
"Dubai_UAE_25.2048493_55.2707828",
"Paris_France_48.856614_2.3522219",
"Tokyo_Japan_35.6894875_139.6917064",
// ADD CITIES HERE (OR EDIT THE ONES ABOVE)
};
_ symbol, NO spaces.
Based on this syntax, you can add new items below the
"Tokyo_Japan_35.6894875_139.6917064" one, the application will show them in the Search City screen.
Categories array
The array below lists a few categories: public static String[] eventsCategories = {
"Anything",
"Music",
"Food & Drink",
"Learn",
"Festival",
"Arts",
"Business",
"Cultural",
"Tour",
"Religion",
"Charity",
"Sports",
"Family",
"Comedy",
"Fashion",
"Seasonal",
"Science",
// ADDITIONAL CATEGORIES HERE...
};
Admin email address
You must replace the following string with a valid email address where you want people to contact you in case of questions, support or even account deletion requests – accordingly to EU GDPR: public static String ADMIN_EMAIL = "admin@example.com";
Utility Functions
Unless you are familiar with iOS programming, you should leave the code below this comment as it is: // MARK: - TABLES & COLUMNS NAMES
DBase Backend
The backend of this template is DBase, you have to install it on your own VPS server - AWS Lightsail is strongly recommemnded - and configure it by following the README instructions.
PLEASE NOTE: If you already bought the iOS version of this template, you don’t need to create a new database, just set the
DATABASE_PATH into the DBase.java file
IMPORTANT: Please also note that if you want to edit the code to make this template work with a different backend (Firebase, Parse, SQL, etc.), you must do it on your own, and I will not be responsible for any bug you may encounter after editing the original source code, nor I can offer support to fix issues
Upload the bkgjobs.js file for the Background job
The package of this template contains a bkgjobs.js file that fires a background job that deletes passed events.So Upload that file into your
dbase folder in your server: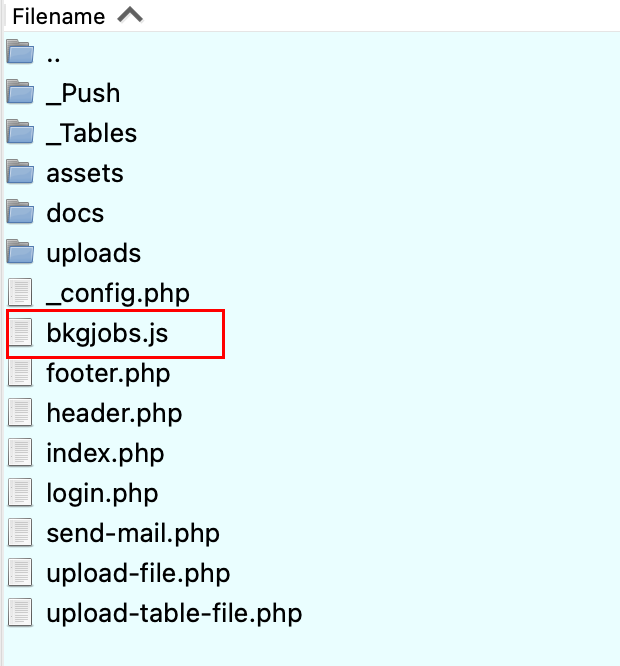
Google Sign In
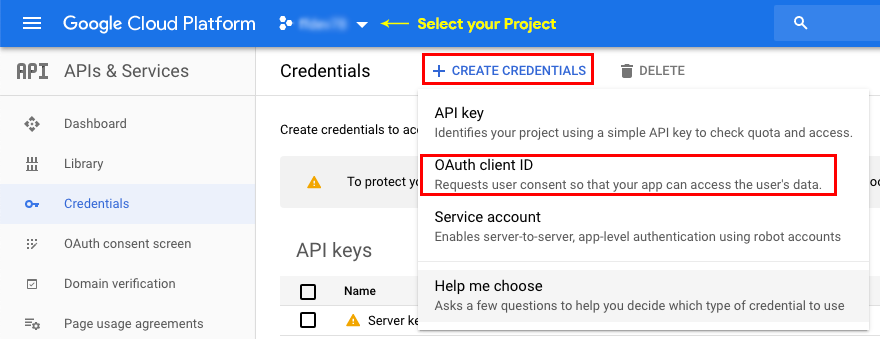
- Go to console.cloud.google.com/apis/credentials on your browser, log in with your Google account
- Create a Project (unless you already have one)
- Click the + CREATE CREDENTIALS button
-
Select the OAuth client ID option
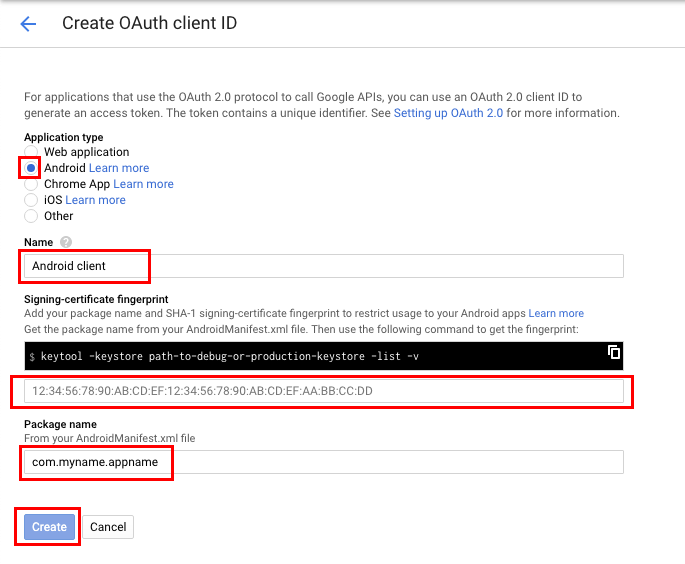
- On the next page, select Android, choose a name for your Client ID
- Paste your own SHA-1 key – follow this tutorial to get it on your Terminal: Getting SHA1 Fingerprint for Google API Console
- Paste the package name of your project
-
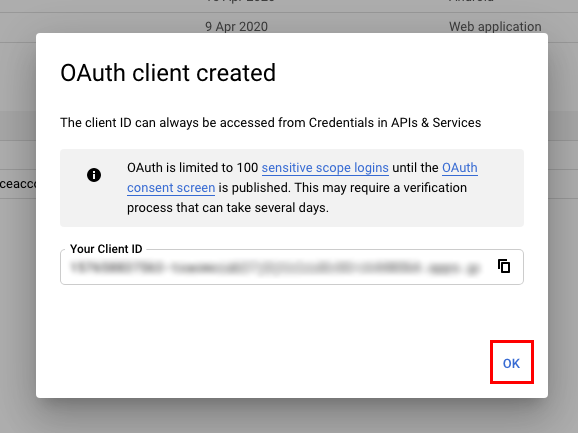
Lastly, click the Create button:
-
Once your Client ID has been created, just click the OK button on the popup ans you’ll be set:
- You can now test the Google Sign In in your app in Development mode.
Once you’ll publish your app on the Play Store, you may need to get the Live SHA1 key and replace the existing one with your new one.
You can obtain the Live SHA1 key in this way:
DBase backend
If you’re an experienced developer and want to implement a different backend in the code, you can still buy this app and do it on your own, since UI/UX is already built.
In case you want to publish more than 1 application using this template, you must purchase a License for each project you want to publish on the App/Play Store, either the Regular ot the Extended one
In case you have edited the code – and so created bugs because of your editing – I may apply some fee to fix your bugs by a remote connection through AnyDesk, or by you sending me your source code for verification.
Download Android Studio
The Find in Files window will show you a list of files where that string is located.
Just comment out (or delete) the following line of code in each file and the app will not show AdMob ads on next run:
Email me through my Profile's Contact Form on Envato
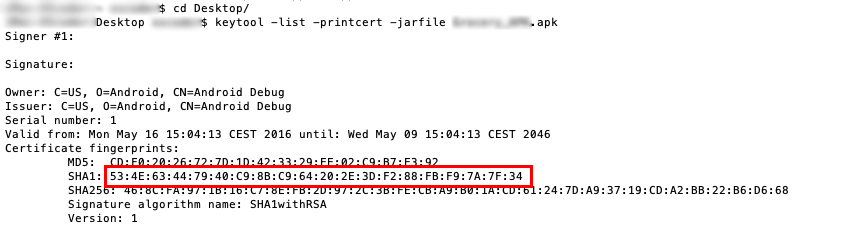
You can obtain the Live SHA1 key in this way:
-
Place the Signed
.apkfile of your app in your Desktop -
Open the Terminal and navigate to the Desktop folder with the
cdcommand -
Use this command:
[Replace YourApkName with the name of your .apk file]keytool -printcert -jarfile YourApkName.apk -
Hit return
You should get the new SHA1 key, like this example:
-
Replace the existing key you have set in your Google Developer Console with the new one, so the Google Sign In will work on your Live app.
You may also find alternative ways to get the SHA1 key in this thread: stackoverflow.com/questions/15727912/sha-1-fingerprint-of-keystore-certificate
Push Notifications
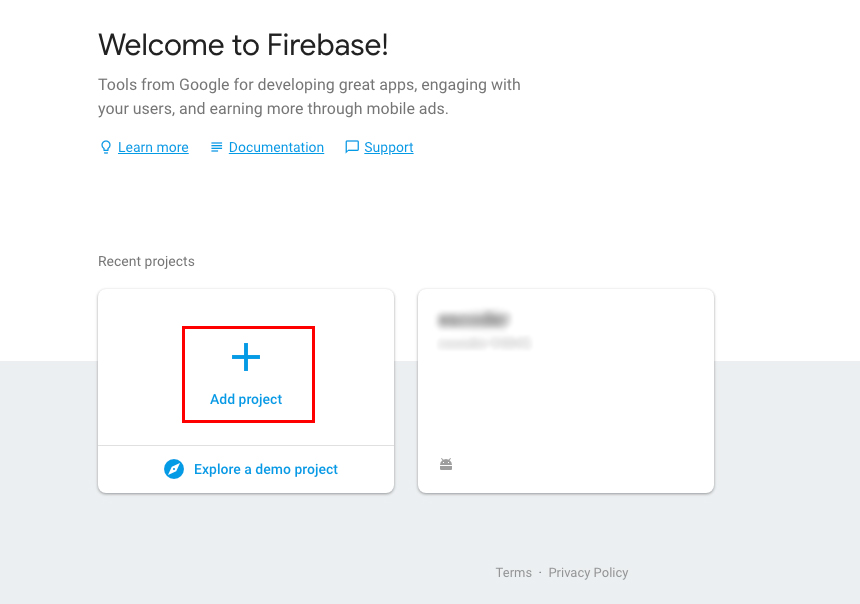
Follow these steps to create a Firebase project and grab the GCM Sender ID and Server Key strings, in order for the app to send/receive Push Notifications:-
Login to your Firebase account and click on + Add project
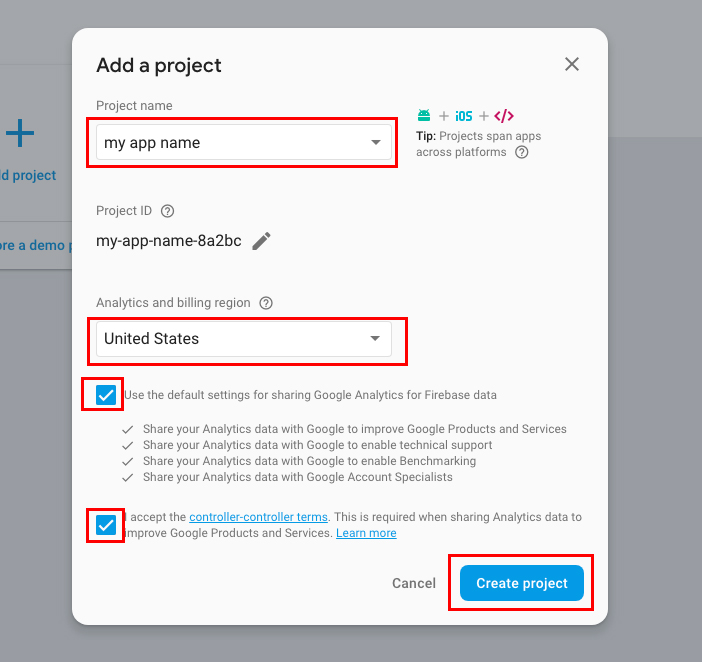
- In the popup window that will show up, enter your app name.
- Select the country where you live in
- Check the Use the default settings for sharing Google Analytics for Firebase data option
- Check the I accept the controller-controller terms option as well
-
Then click Create project
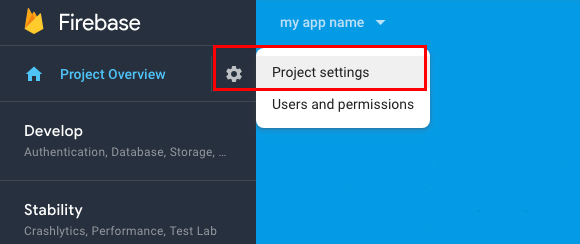
- When Firebase has created your project, click Continue
-
On the top-left corner of the page, next to Project Overview, click the gear icon and select Project settings from the menu
-
In the Project settings page, click the Cloud Messaging tab, here’s where you can copy the Server Key
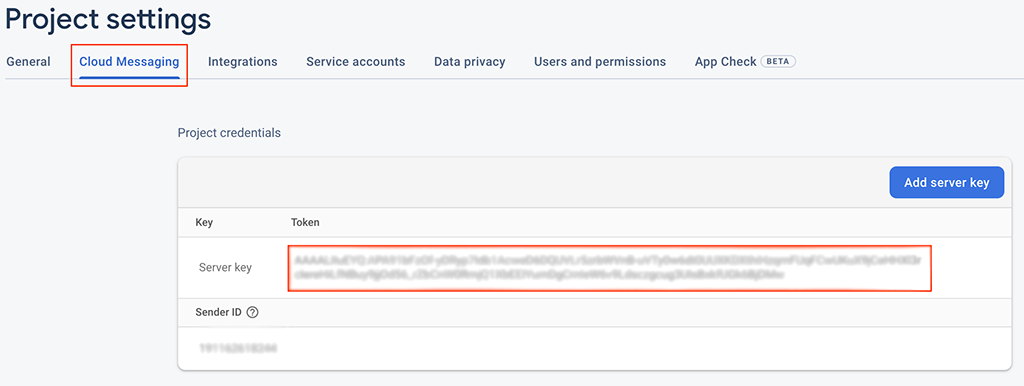
-
Open the
_config.phpfile of the DBase API in your server and paste the Server Key you just copied in this variable, then save the file:$FCM_SERVER_KEY = '[paste the Server Key here!]'; -
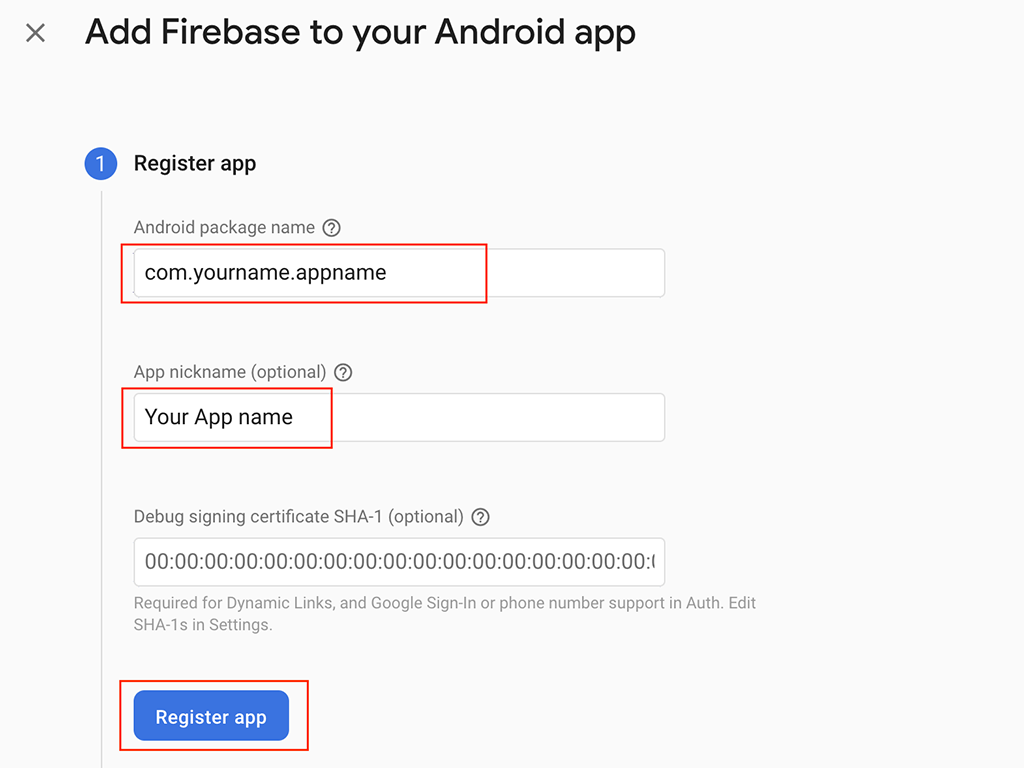
Now go back to yourt Firebase dashboard, in the General tab, click the Add app button

- Select the Android icon in the popup window
-
In the next page, paste the package name of your Android Studio project, your app name, and click the Register app button
-
Download the
google-services.jsonfile and click Next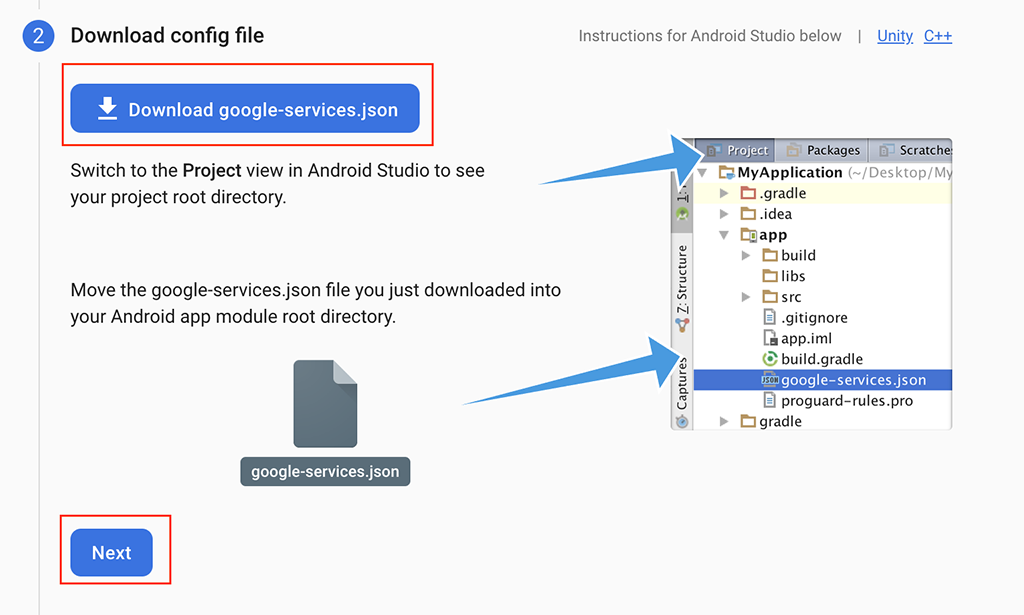
- Click the Next button for the two other steps to return to your Firebase dashboard
-
Move the
google-services.jsonfile in the app folder of the Android Studio project:
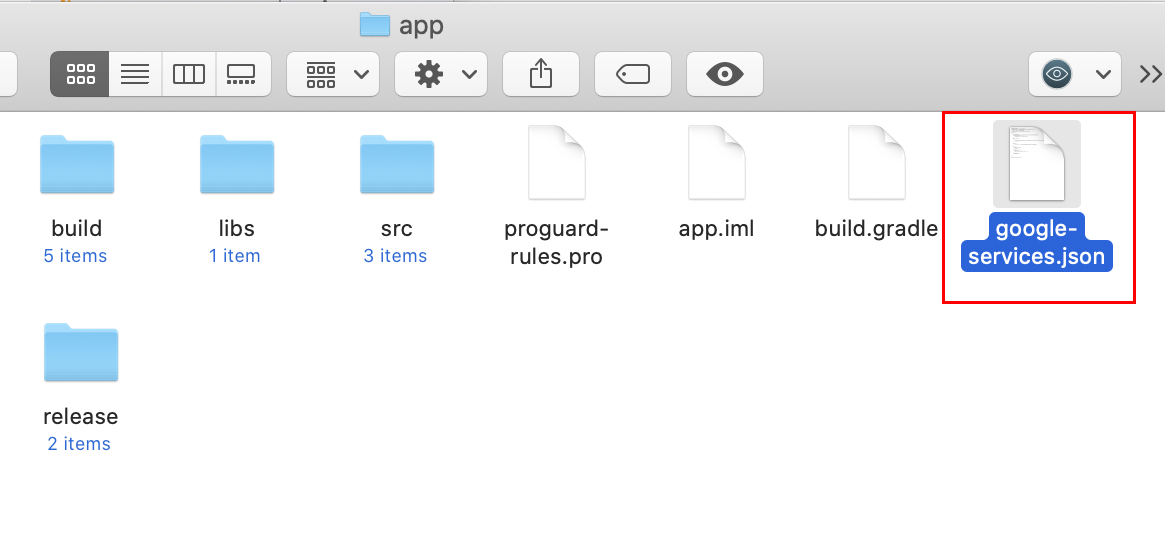
- Done. Your app is ready to send/receive Push Notifications
Useful stuff
DBase backend
F.A.Q.
Should I use the DBase API to make this template work?
The code of this app template is written using the DBase SDK for Android – included in the project – so you must download and install the DBase backend in your won VPS server to make it work the way it is.If you’re an experienced developer and want to implement a different backend in the code, you can still buy this app and do it on your own, since UI/UX is already built.
Anyway, as mentioned earlier, please note that I will not be responsible for any bug encountered after editing the original source code to implement a different backend or extra features not included in the original source code
If I buy this app template, can I use for multiple projects?
No, only 1 app/purchase.In case you want to publish more than 1 application using this template, you must purchase a License for each project you want to publish on the App/Play Store, either the Regular ot the Extended one
Can I use the DBase API for different projects/apps than this one?
Yes, you can use it in any other application or projectWhat kind of support is offered?
Free support is offered in case of bugs encountered in the original template, either in the code or the UI design.In case you have edited the code – and so created bugs because of your editing – I may apply some fee to fix your bugs by a remote connection through AnyDesk, or by you sending me your source code for verification.
This doesn't apply in case you changed the code to implement a different backend than DBase
Should I use Android Studio to edit this template?
Yes, you must always use the latest stable official version of Android Studio to edit this application – NO Betas, they don’t work properly!Download Android Studio
I’ve performed all configurations mentioned in this Guide, but something is wrong. What should I do?
- Double-check all your configurations, probably you have missed something
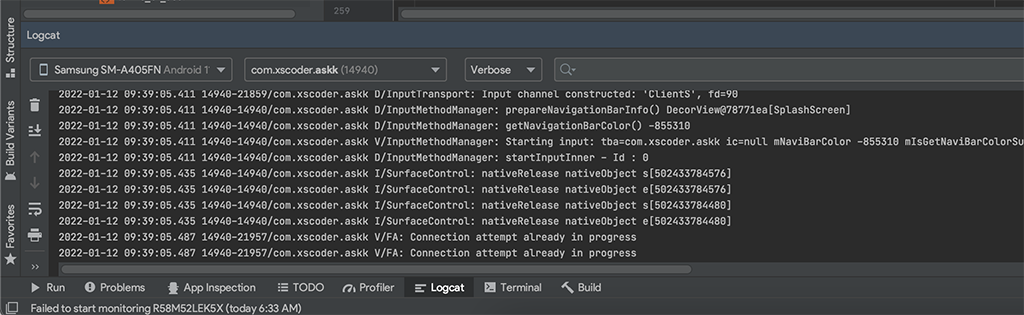
- Always check the Logcat in Android Studio if the app crashes, usually the error messages are shown in red color
How do I remove AdMob ads?
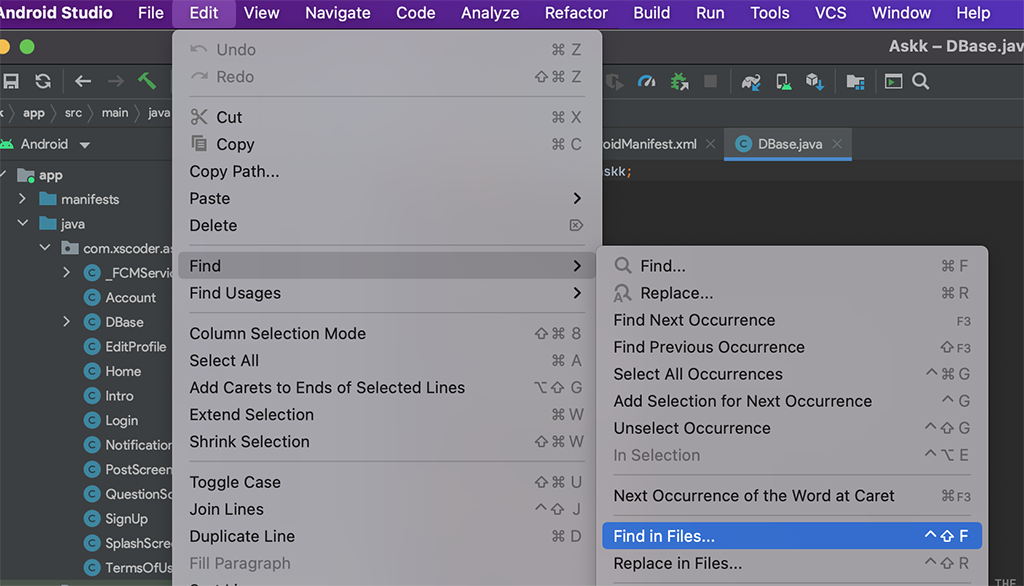
It’s super easy, just open the Find in Files... tool in Android Studio by clicking Edit -> Find -> Find in Files..., and search for: fireInterstitialAd;
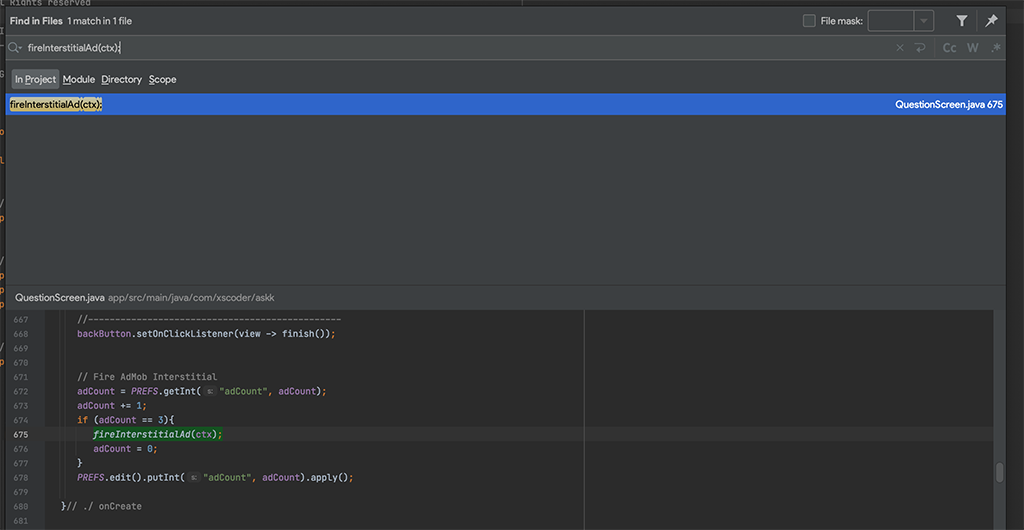
The Find in Files window will show you a list of files where that string is located.
Just comment out (or delete) the following line of code in each file and the app will not show AdMob ads on next run:
fireInterstitialAd(ctx);
// in the beginning:
// fireInterstitialAd(ctx);
Support
PLEASE NOTE: I can offer FREE support for bugs/errors encontered in the original code.Email me through my Profile's Contact Form on Envato