Documentation
Introduction
Please carefully read this guide in order to fully configure this template, and remember to test it on a Real Device – the Emulator may fail.
Quick Start
You may just run this app on your own device via Xcode and play with it, it will work.
Anyway you need to customize this app into your own version, so just keep reading this guide.
Anyway you need to customize this app into your own version, so just keep reading this guide.
General
XCode
This template has native Apple Swift code, so you can edit it only with Xcode running on a Mac computer. If you don’t have it, download it for free on the Mac App Store.
PLEASE NOTE that you’ll need the latest official version of Xcode, NO BETAS, because Betas are always buggy and never work properly.
App Name and Bundle ID
You must change the Display Name and Bundle Identifier into the new ones in the General tab in Xcode: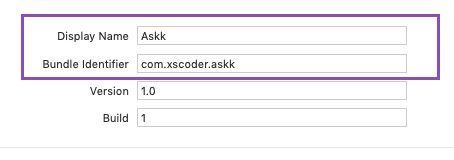
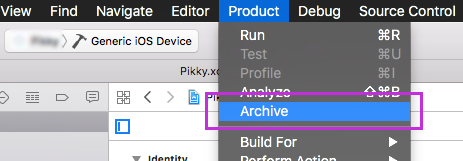
Archive App for App Store Publishing
Once your app is ready to be submitted to the App Store for review, you need to Archive your Xcode project.Click on Product and select Archive. Xcode will archive your project and automatically open the Organizer window, where you’ll find a button to submit your binary to your App Store Connect account.
Info.plist – Privacy Alert text
You should check theInfo.plist file – you can find it in the files list on the left-side panel – and set the text you wish in the Value column of the Privacy rows.Those values are the explanations that will be displayed in the Permission Alerts that show up to access the Camera, Photo Library or Location Service, so you may edit them as you wish based on your language or what you exactly want users to see in those Alerts.
Apple reviewers check those texts out all the times, and if the message is not so clear to them, they may reject your app while in Review, so please type a short but exhaustive text in each row in order to make clear what Permission the users should allow.

Reskin the UI design of the app
This project has a Storyboard file calledMain.storyboard and you can find it in the list of file that is shown in left-side panel of the Xcode window.You can edit all the UI elements of this app from the Storyboard, Colors, Fonts, Buttons, Views positions, etc.
The strings of the Alert Controllers are located in the code, so they can be edited only in the .swift files.
The images are stores into the
Assets.xcassets folder.
Configurations
• The Configurations.swift file
Open this file in XCode and keep reading this guide, you’ll have to perform some edits in this file in order to get your template ready to runApp Name
Replace this string with the new name you want to give to this app: let APP_NAME = "Shotquotes"
AdMob Ads
Replace the string of the variable below with your own Interstitial Unit ID – you have to create such Unit ID on apps.admob.com, just follow the instructions on the AdMob’s website in case you don’t know how to generate a Unit ID: let ADMOB_INTERSTITIAL_UNIT_ID = "ca-app-pub-3940256099942544/1033173712"
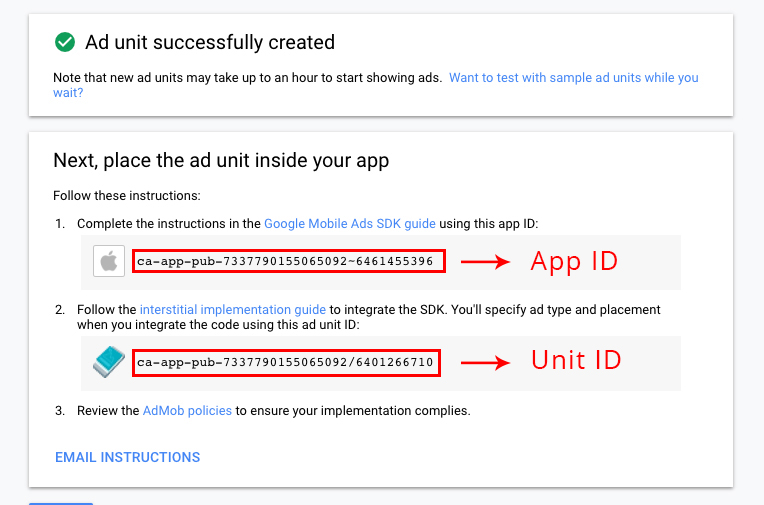
Info.plist with your own App ID:
You can get both App ID and Unit ID strings from your AdMob Unit page, after creating it:
Custom Colors
You can edit the HEX values of the following variables as you wish, change the numbers before the# symbol. The main color of the app and some UI will be affected by your change:
let MAIN_COLOR = hexValue(hex: "#23A0F1")
PLEASE NOTE that NOT all Views in the app will change accordingly to the new RGB values you’ve set in the above variable, you will still need to adjust some colors in some Controllers in the Storyboard.
Custom fonts
This App uses some custom font, which is already stored into Xcode in a dedicated folder.In case you want to add a new font, you have to first drag your
.ttf or .otf font file into the left-side panel in Xcode and click the Finish button in the popup that will show up:
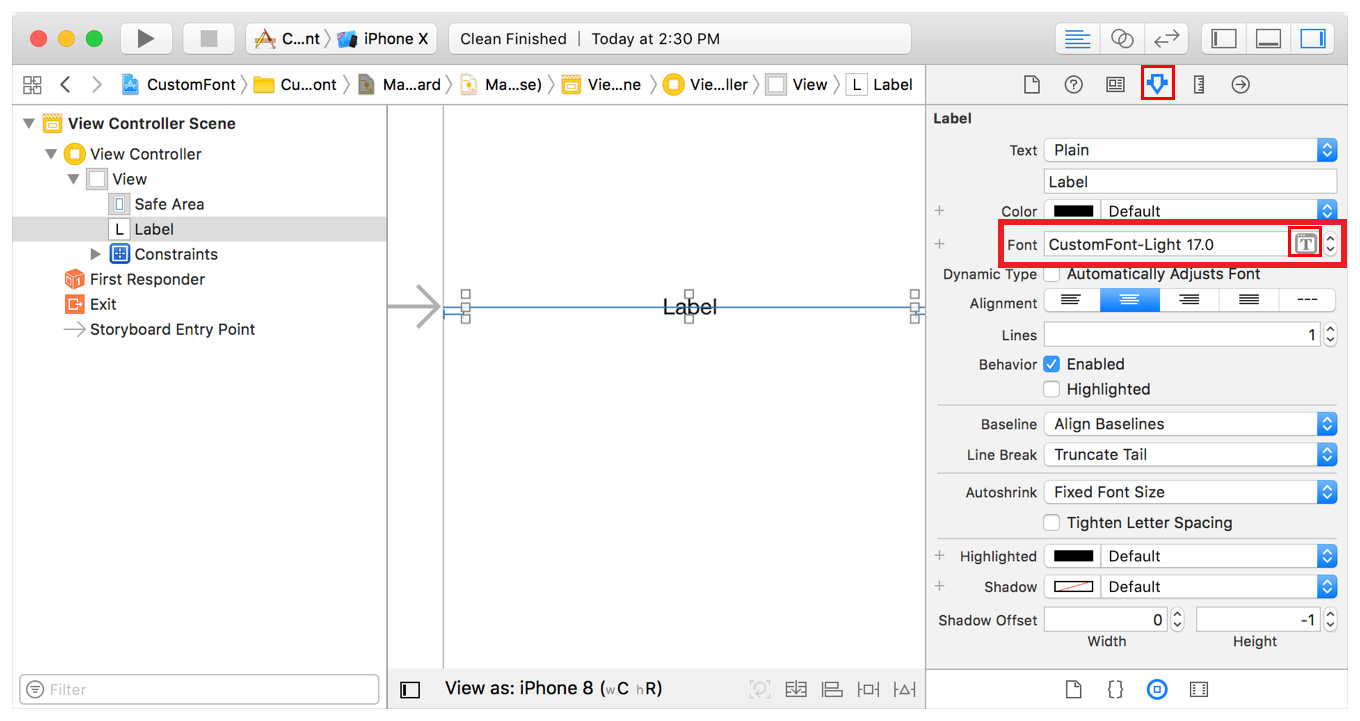
Then select the Label, Button, TextFiled or textView you want to change font to, click the [T] icon on the right-side Attributes inspector panel and select the font you want in the dropdown list:
Sharing message
When you’re about to share a picture, the app shows a custom message, you can edit it as you wish by changing the string of the below variable: let SHARING_MESSAGE = "Hey, check out my awesome quote, I've made it with #\(APP_NAME) "
Array of Photo Filters
This app uses a few CoreImage standard filters for photos, which are listed in the following array: var filtersArray = [
"None",
"CIPhotoEffectInstant",
"CIPhotoEffectProcess",
"CIPhotoEffectTransfer",
"CISepiaTone",
"CIPhotoEffectFade",
"CIPhotoEffectTonal",
"CIPhotoEffectNoir",
"CIDotScreen",
"CIColorMonochrome"
]
Free and Total amount of overlays
The following 2 variables store the amount of FREE and TOTAL amount of overlay images (stored into the OVERLAYS folder): let FREE_OVERLAYS = 15
let ALL_OVERLAYS = 84
In-App Purchase - Prepare your app for IAP
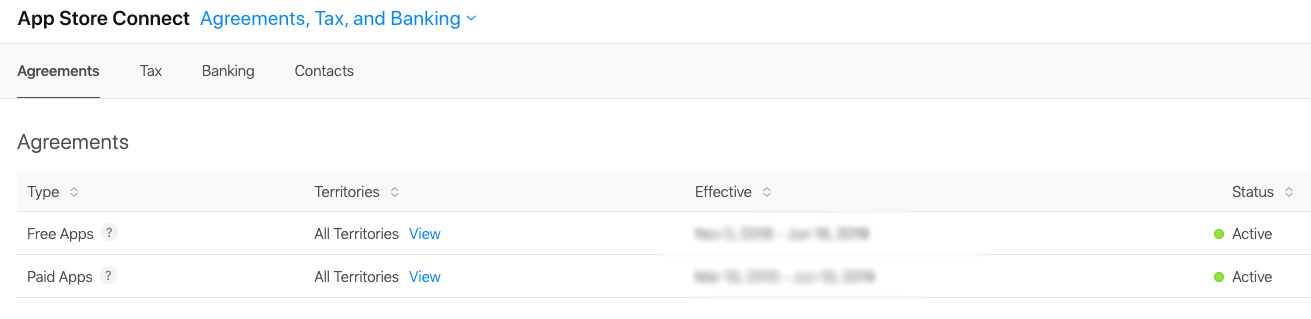
In order to get In-App Purchase ready for your app, you need to create your app’s page on the App Store Connect website: https://appstoreconnect.apple.com/You also must have an Active Paid Apps Agreement in the Agreemets, Tax, and Banking section, otherwise, you won’t be able to create or benefit of IAP:
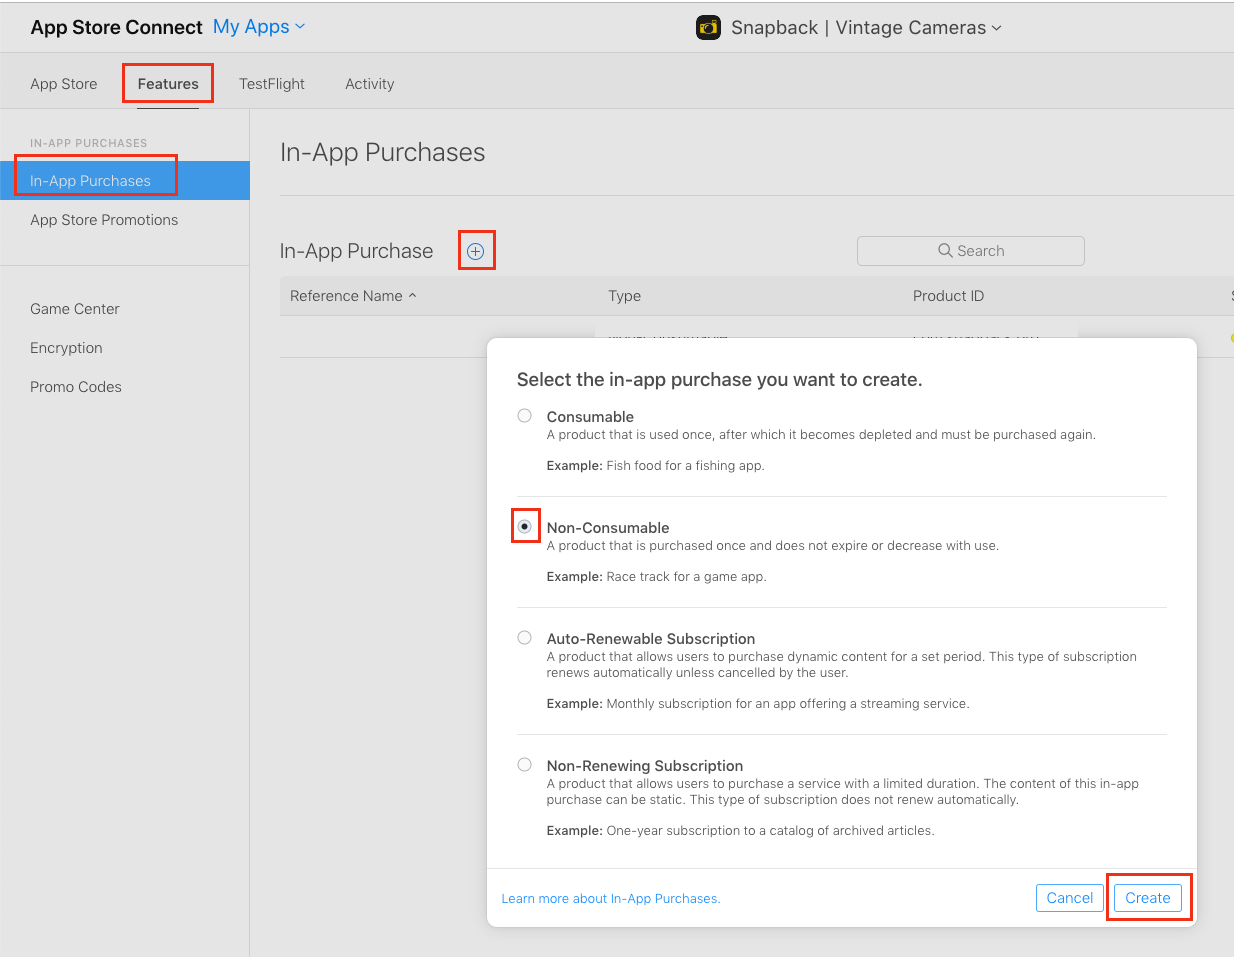
After you’ve created your app’s page in the My Apps section and set your App Information, enter the Features -> In-App Purchases section, click the + button and select the Non-Consumable option, then click the Create button:
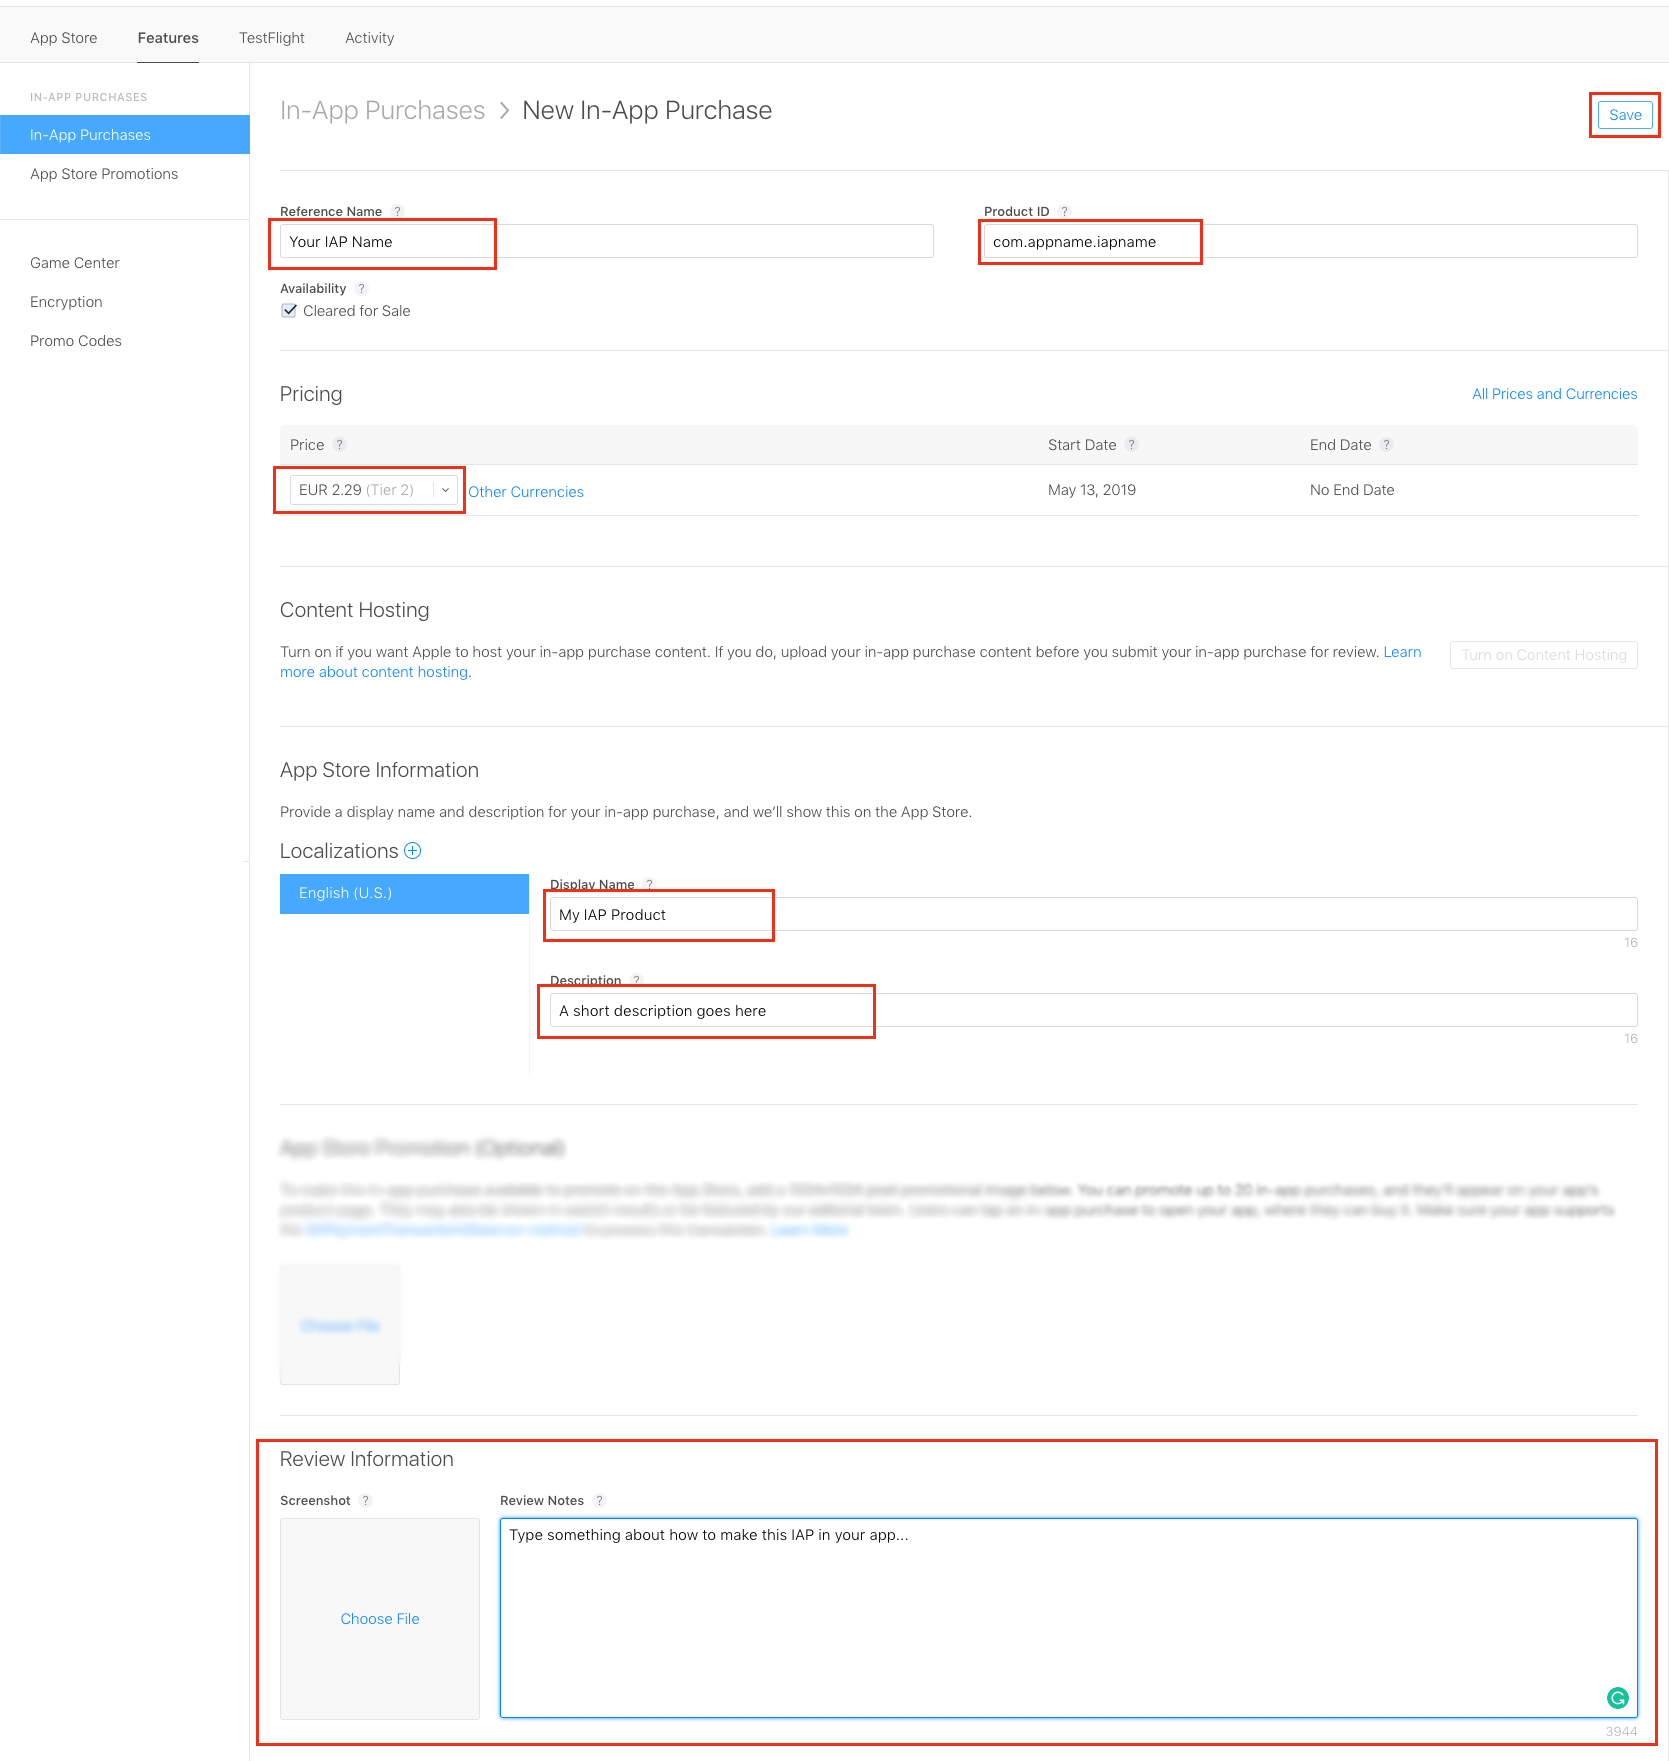
Fill the fields with the reference name of your IAP product and its ID (something like com.appnamne.productid), select its Price, Display Name, Description, and the Review Information, then click the Save button. Check this screenshot as an example:
Enter the Prepare for Submission section, scroll down to where In-App Purchases title is and click the + button. Select the IAP product you’ve just created and click the Done button.
Now you can enter Xcode, the Configurations.swift file, and replace the string of the following variable with the IAP Product ID you’ve previously set on the App Store Connect page:
let IAP_PRODUCT_ID = "com.shoutquotes.unlockoverlays"
Utility Functions
Unless you are familiar with iOS programming, you should leave the code below this comment as it is: // MARK: - TABLES & COLUMNS NAMES
Useful stuff
DBase backend
F.A.Q.
If I buy this app template, can I use for multiple projects?
No, only 1 app/purchase.In case you want to publish more than 1 application using this template, you must purchase a License for each project you want to publish on the App/Play Store, either the Regular ot the Extended one
What kind of support is offered?
Free support is offered in case of bugs encountered in the original template, either in the code or the UI design.In case you have edited the code – and so created bugs because of your editing – I may apply some fee to fix your bugs by a remote connection through AnyDesk, or by you sending me your source code for verification.
Should I use XCode to edit this template?
Yes, you must always use the latest stable official version of XCode to edit this application – NO Betas, they don’t work properly!Download the latest version on the Mac App Store from your Mac.
I’ve performed all configurations mentioned in this Guide, but something is wrong. What should I do?
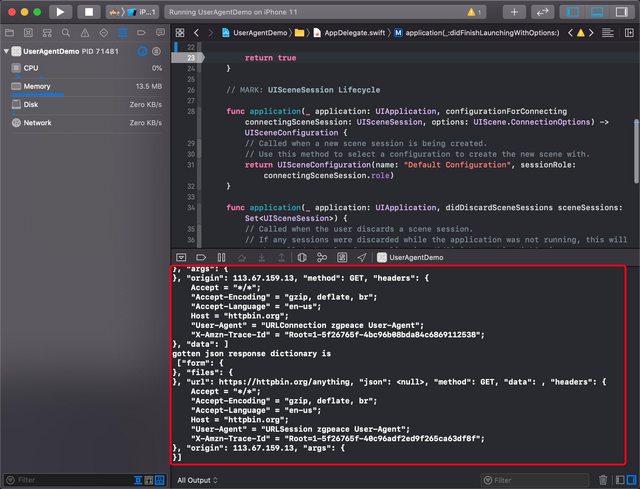
• Double-check all your configurations, probably you have missed something.• Always check the Console log in Xcode if the app crashes.
• The Console log helps to debug your app, it’s really important:
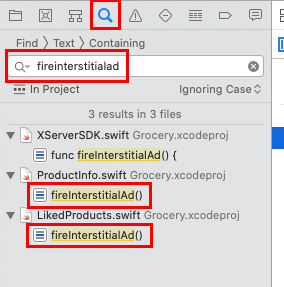
How do I remove AdMob ads?
It’s super easy, just open the Find tool on the left-side panel in XCode and search for this line: fireInterstitialAd;
Click on each row and just comment that line of code in each the swift file:
Support
PLEASE NOTE: I can offer FREE support for bugs/errors encontered in the original code.Email me through my Profile's Contact Form on Envato